Fortify Your Django REST API: Best Practices for Enhanced Security

Fortify Your Django REST API: Best Practices for Enhanced Security
Welcome to part six of our Django REST Framework (DRF) tutorial series! In the previous parts, we built the foundation of our Task Manager API, implemented core functionality, and added authentication. Now, it's time to focus on a critical aspect often overlooked: security. This installment delves into essential best practices to harden your API against common vulnerabilities and enhance its resilience.
This tutorial builds upon the previous installments, which you can find here:
- Part 1: Setting up Django and DRF
- Part 2: Implementing CRUD Operations
- Part 3: Securing the API with Token Authentication
- Part 4: Personalizing with User-Owned Tasks
- Part 5: Optimizing API Performance
Table of Contents
- Step 1: Implement Rate Limiting
- Step 2: Configure CORS for Safe Cross-Origin Requests
- Step 3: Enhance Input Validation
- Step 4: Secure Error Handling
- Step 5: Deploy with HTTPS (Preparation)
- Step 6: Set Up Logging for Monitoring
- Step 7: Test with Postman
- Conclusion
- What's Next?
Step 1: Implement Rate Limiting
Rate limiting is crucial for preventing abuse and denial-of-service attacks. It restricts the number of requests a client can make within a given time frame. Django REST Framework provides built-in throttling mechanisms to simplify this process.
Update taskmanager/settings.py
REST_FRAMEWORK = {
    'DEFAULT_AUTHENTICATION_CLASSES': (
        'rest_framework.authentication.TokenAuthentication',
    ),
    'DEFAULT_PERMISSION_CLASSES': (
        'rest_framework.permissions.IsAuthenticated',
    ),
    'DEFAULT_THROTTLE_CLASSES': [
        'rest_framework.throttling.UserRateThrottle',
        'rest_framework.throttling.AnonRateThrottle',
    ],
    'DEFAULT_THROTTLE_RATES': {
        'user': '100/minute',  # Authenticated users
        'anon': '50/minute',   # Anonymous users
    },
}
UserRateThrottle limits authenticated users based on their ID, while AnonRateThrottle limits anonymous users by IP address. Adjust these rates as needed for your application's requirements. Consider using a more granular approach, such as burst rates, for better control.
Step 2: Configure CORS for Safe Cross-Origin Requests
Cross-Origin Resource Sharing (CORS) allows web applications from different domains to access your API securely. We'll leverage the django-cors-headers package.
Install the package:
pip install django-cors-headers
Update taskmanager/settings.py:
INSTALLED_APPS = [
    ...
    'corsheaders',
]

MIDDLEWARE = [
    'corsheaders.middleware.CorsMiddleware',
    'django.middleware.security.SecurityMiddleware',
    ...
]

CORS_ORIGIN_WHITELIST = (
    'http://localhost:3000',  # Example frontend origin
)
For development, CORS_ORIGIN_ALLOW_ALL = True offers convenience, but remember to disable it in production for robust security. Consider using a more refined whitelist approach for better control over allowed origins.
Step 3: Enhance Input Validation
Input validation is paramount to prevent vulnerabilities like injection attacks. Let's improve the TaskSerializer with stricter rules.
Update tasks/serializers.py
from rest_framework import serializers
from .models import Task
class TaskSerializer(serializers.ModelSerializer):
class Meta:
model = Task
fields = ['id', 'title', 'description', 'completed', 'created_at', 'created_by']
read_only_fields = ['id', 'created_at', 'created_by']
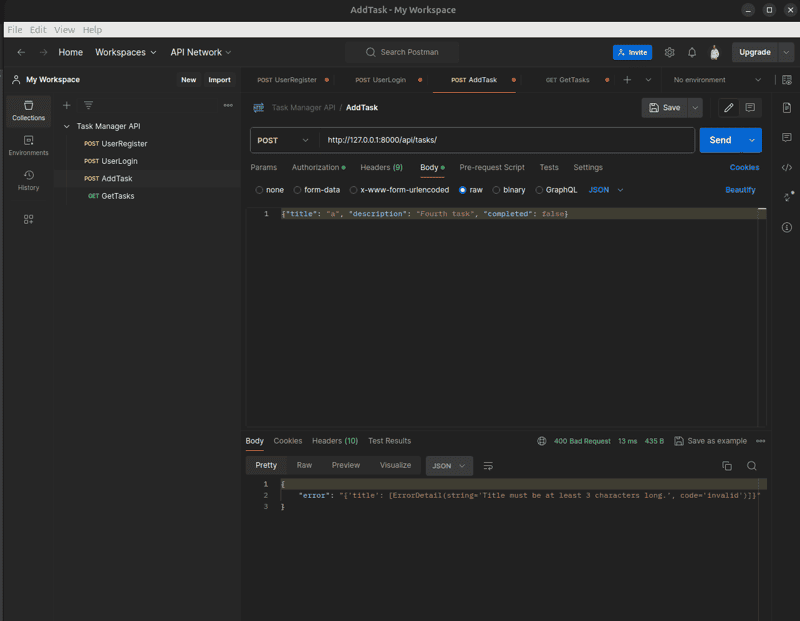
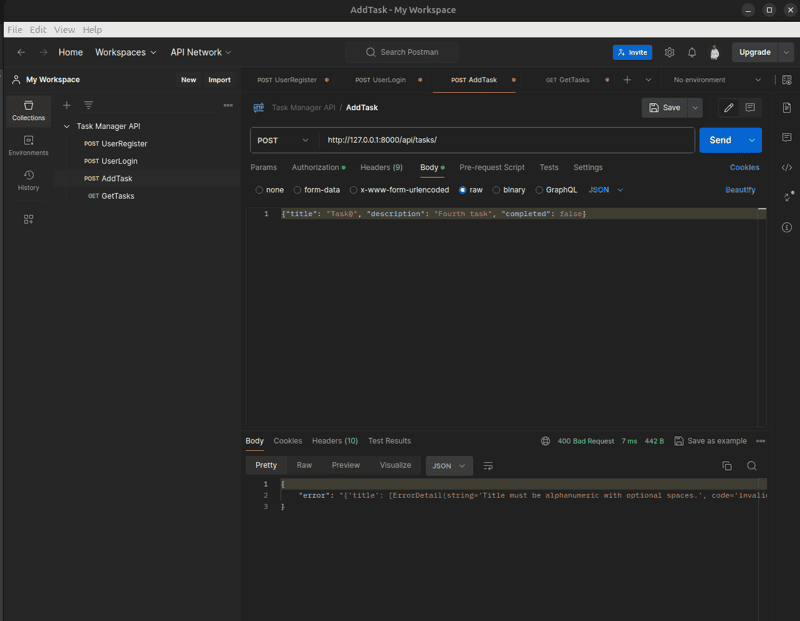
def validate_title(self, value):
if len(value) < 3:
raise serializers.ValidationError("Title must be at least 3 characters long.")
if not value.replace(' ', '').isalnum(): # Allow spaces but check alphanumeric content
raise serializers.ValidationError("Title must be alphanumeric with optional spaces.")
return value
This enhanced validation ensures title length and alphanumeric composition, minimizing the risk of malicious input.
Step 4: Secure Error Handling
Custom error handling prevents exposing sensitive information. Generic, non-descript error messages are returned to the client, enhancing security.
Create tasks/exceptions.py
from rest_framework.views import exception_handler
from rest_framework.response import Response
from rest_framework.exceptions import ValidationError

def custom_exception_handler(exc, context):
    response = exception_handler(exc, context)
    if response is not None:
        if isinstance(exc, ValidationError):
            # For validation errors, preserve the field-specific error structure
            response.data = {'error': response.data}
        else:
            # For other errors, use a generic message or the detail if available
            response.data = {'error': response.data.get('detail', str(exc))}
    return response
Update taskmanager/settings.py
REST_FRAMEWORK = {
    # Existing settings...
    'EXCEPTION_HANDLER': 'tasks.exceptions.custom_exception_handler',
}
Step 5: Deploy with HTTPS (Preparation)
HTTPS is essential for securing data in transit. While a full production HTTPS setup requires a server with SSL/TLS enabled, we can simulate this locally using ngrok.
Prerequisites: ngrok Account and Authtoken
- Sign up for a free ngrok account at https://dashboard.ngrok.com/signup.
- Obtain your authtoken from https://dashboard.ngrok.com/get-started/your-authtoken.
- Install the authtoken using
ngrok config add-authtoken <your-authtoken>.
Install ngrok:
Install via pip: pip install pyngrok. Or download from https://ngrok.com and follow the instructions for your operating system.
Preparation
Run your Django server: python manage.py runserver. In a new terminal, start ngrok: ngrok http 8000. Update taskmanager/settings.py:
# HTTPS settings for ngrok
SECURE_SSL_REDIRECT = False  # Set to True when testing with ngrok
SECURE_PROXY_SSL_HEADER = ('HTTP_X_FORWARDED_PROTO', 'https')  # Trust ngrok's X-Forwarded-Proto header

# Update ALLOWED_HOSTS to include the ngrok domain
ALLOWED_HOSTS = ['127.0.0.1', 'localhost', 'abcd1234.ngrok-free.app']  # Replace with your ngrok domain
Remember to update ALLOWED_HOSTS with your ngrok domain. For production, deploy to a server with proper SSL/TLS configuration.
Step 6: Set Up Logging for Monitoring
Logging provides valuable insights into API usage, aiding in detecting and responding to potential security issues.
Update taskmanager/settings.py
LOGGING = {
    'version': 1,
    'disable_existing_loggers': False,
    'handlers': {
        'console': {
            'class': 'logging.StreamHandler',
        },
        'file': {
            'class': 'logging.FileHandler',
            'filename': 'debug.log',
        },
    },
    'loggers': {
        '': {
            'handlers': ['console', 'file'],
            'level': 'INFO',
            'propagate': True,
        },
        'django': {
            'handlers': ['console', 'file'],
            'level': 'INFO',
            'propagate': True,
        },
    },
}
Step 7: Test with Postman
Thorough testing is crucial. We'll use Postman and a Python script to verify the implemented security features.
1. Test Rate Limiting
The following Python script automates requests to test rate limiting:
import requests
import time

# Configuration
BASE_URL = "http://127.0.0.1:8000/api/tasks/"  # Use HTTP for local development server; switch to ngrok HTTPS URL in Step 5
TOKEN = "<your-token>"  # Replace with your actual token from Postman

# Headers for authenticated requests
AUTH_HEADERS = {
    "Authorization": f"Token {TOKEN}"
}

# Headers for anonymous requests (no token)
ANON_HEADERS = {}

def test_rate_limiting(user_type, headers, limit):
    print(f"\nTesting rate limiting for {user_type} user (limit: {limit} requests/minute)...")
    request_count = 0
    start_time = time.time()

    while True:
        try:
            response = requests.get(BASE_URL, headers=headers, timeout=5)
            request_count += 1

            # Print request number and status code
            print(f"Request {request_count}: Status {response.status_code}")

            # Print response body for non-200 status codes
            if response.status_code != 200:
                try:
                    print(f"Response body: {response.json()}")
                except ValueError:
                    print(f"Response body (non-JSON): {response.text}")

            # Check for 429 Too Many Requests
            if response.status_code == 429:
                print(f"Rate limit hit after {request_count} requests for {user_type} user!")
                break

            # Stop if we exceed the expected limit + a buffer
            if request_count > limit + 10:
                print(f"Rate limit not hit after {request_count} requests. Something might be wrong.")
                break

        except requests.RequestException as e:
            print(f"Request failed: {e}")
            break

    elapsed_time = time.time() - start_time
    print(f"Time taken: {elapsed_time:.2f} seconds")

def main():
    # Test for authenticated user (100 requests/minute)
    test_rate_limiting("authenticated", AUTH_HEADERS, 100)

    # Test for anonymous user (50 requests/minute)
    test_rate_limiting("anonymous", ANON_HEADERS, 50)

if __name__ == "__main__":
    main()
Remember to replace <your-token> with your actual token. Run this script to verify the rate limiting functionality.
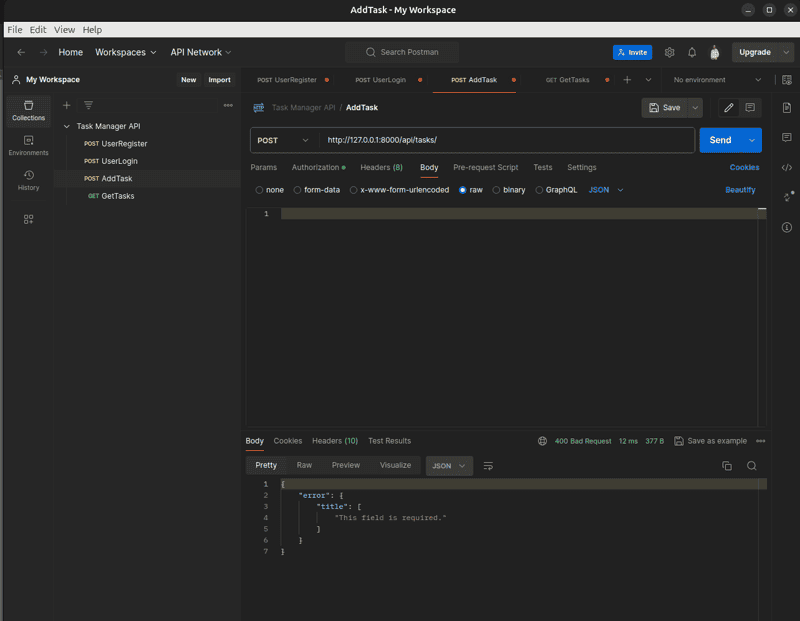
2. Test Input Validation
Use Postman to send requests with invalid data to test input validation. You should observe appropriate error responses for short or non-alphanumeric titles.
3. Test Error Handling
Send requests that trigger different error conditions to verify the custom exception handler. Expect generic error messages to be returned.
4. Test HTTPS (Local)
With ngrok running, set SECURE_SSL_REDIRECT = True and restart your server. Use Postman to test that your API is accessible via the HTTPS URL generated by ngrok.
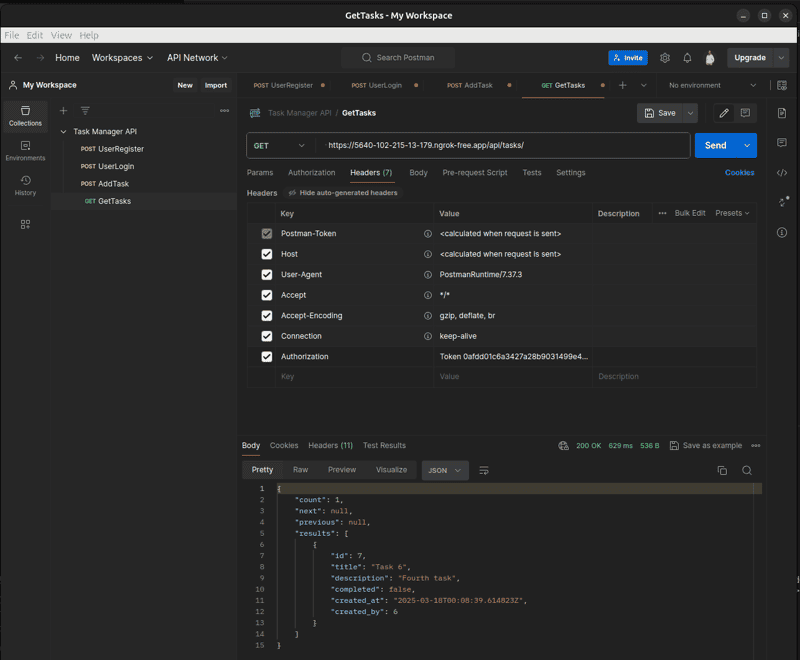
Remember to revert to HTTP testing after verification for standard local development. This test is for local development. Production deployments will require setting up an appropriate HTTPS server.
5. Test Logging
Send several API requests and then examine the debug.log file for the expected log entries. This will help you understand API usage patterns and detect anomalies in your API calls.
Conclusion
By implementing these security best practices, your Django REST API is significantly more robust and resilient against common threats. Rate limiting, CORS configuration, input validation, secure error handling, HTTPS, and logging are no longer optional, but essential components of any production-ready API.
What's Next?
In the next part of this series, we will enhance our API by generating interactive API documentation with OpenAPI and Swagger!
Related Articles
Software Development
Unveiling the Haiku License: A Fair Code Revolution
Dive into the innovative Haiku License, a game-changer in open-source licensing that balances open access with fair compensation for developers. Learn about its features, challenges, and potential to reshape the software development landscape. Explore now!
Read MoreSoftware Development
Leetcode - 1. Two Sum
Master LeetCode's Two Sum problem! Learn two efficient JavaScript solutions: the optimal hash map approach and a practical two-pointer technique. Improve your coding skills today!
Read MoreBusiness, Software Development
The Future of Digital Credentials in 2025: Trends, Challenges, and Opportunities
Digital credentials are transforming industries in 2025! Learn about blockchain's role, industry adoption trends, privacy enhancements, and the challenges and opportunities shaping this exciting field. Discover how AI and emerging technologies are revolutionizing identity verification and workforce management. Explore the future of digital credentials today!
Read More